
Auto-Install Free SSL – Generate & Install Free SSL Certificates
Active Installs
8,000+
Last Updated
September 14, 2026
First Released
January 31, 2019
Download History (Last one month)
Auto-Install Free SSL
With over 390 five-star reviews ⭐⭐⭐⭐⭐ and a 4.9 out of 5 stars average rating, ‘Auto-Install Free SSL’ empowers you to generate Free SSL Certificates in your WordPress dashboard effortlessly. This plugin helps secure your website and saves you money.
Let’s Encrypt™ SSL Certificate is FREE. But they provide it through their API. If you are not a programmer, you need to study and practice programming for years to be able to use the API of Let’s Encrypt™ to generate a single Free SSL Certificate for your WordPress website.
Here is where ‘Auto-Install Free SSL’ comes into play. This WordPress plugin provides a hassle-free way to obtain and install the Let’s Encrypt™ free SSL certificate for your website. You don’t need programming or coding experience to set it up. With this plugin, you don’t need to spend hours configuring SSL or waste money purchasing SSL certificates. All you need is a few minutes.
Minimum System Requirements
- Linux or Windows hosting
- WordPress 4.1
- PHP 5.6
- OpenSSL extension
- Curl extension
- The website should be assigned to a domain name (e.g., example.com) accessible online.
- Ensure your web server can serve static files – a standard feature in most web servers.
FREE PLUGIN FEATURES
- Domain Ownership Verification.
- Generate and renew Free SSL Certificate.
- One-click Download the generated SSL certificate, Private key, and CA Bundle files.
- Video tutorial on cPanel: (1) How to upload HTTP-01 challenge files to verify domain ownership. (2) How to Install the Free SSL Certificate.
- Written tutorial on Plesk for the above two topics.
- One-click Force SSL activation, i.e., HTTPS redirect, fix insecure links and mixed content warning, display the padlock in the browser’s address bar with ONLY ONE CLICK.
- One-click revert to HTTP if required.
- Automatic renewal reminder by email and admin notice before the SSL expiry date.
- Automatic account registration with Let’s Encrypt™.
- Automatic CSR (Certificate Signing Request) generation.
The free https SSL certificate issued by Let’s Encrypt™ expires in 90 days. They recommend renewing 30 days before expiry. Please check the FAQ section to learn why the lifetime is 90 days.
Use this plugin only for HTTPS redirects too.
If your WordPress website has an SSL certificate installed and you are looking ONLY for Force SSL activation (i.e., HTTPS redirect, fix insecure content), you can use the FREE version.
PREMIUM PLUGIN FEATURES
- Automatic Verification of Domain Ownership.
- Automatic Generation of Free SSL Certificate.
- Automatic Installation of Free SSL Security Certificate (cPanel or root access is required for this automation). [However, if you have neither cPanel nor root access, we’ll Install the SSL manually for the first time and provide documentation on how to install SSL manually].
- Automatic Renewal of Free SSL Certificate (30 days before expiry).
- Automatic Cron Job. No need to set the Cron Job manually.
- Automatic account registration with Let’s Encrypt™.
- Automatic CSR (Certificate Signing Request) generation.
- One-click Force SSL activation.
- One-click revert to HTTP if required.
- One-to-one Premium Support.
- SSL installation training for non-cPanel websites.
- Automatic WildCard SSL certificate for free! (Generation and installation of an SSL certificate for a domain that covers all its sub-domains.)
- Automatically sets the DNS TXT record to verify the domain and generate free wildcard SSL certificates (supported DNS service providers: Cloudflare, Godaddy, Namecheap, and cPanel.)
- Supports Multisite.
- Works on all the websites hosted on a cPanel / web hosting.
- If needed, you can revoke any SSL certificate and change your Let’s Encrypt™ account key.
(The last five features are available for the unlimited sites license only.)
If your WordPress website is hosted on a VPS or dedicated server and you don’t have cPanel, Automatic Installation of the Free SSL Certificate is still possible. Please get in touch with us after purchase.
Benefits of installing an SSL certificate on your WordPress website
-
Protect your users’ data: If an SSL certificate is installed, your WordPress website’s data travels through the internet with 2048-bit (or more) encryption. No computer or hacker in between can read your users’ encrypted data. Only the intended recipient (users’ browser or your server) can decrypt and read the encrypted data. The data may be credit card-like necessary payment details, user input with a contact form, or a simple login form.
-
Display PADLOCK: Installing an SSL certificate is not optional anymore, even if your WordPress website doesn’t accept credit cards. Since July 2018, with version 68, Google Chrome has started to mark all HTTP (no SSL) websites as ‘Not secure’, even if it doesn’t accept user input. All other browsers followed the same path. When users visit an SSL-secured website, all browsers display a secured PADLOCK in the address bar.
-
Boost the Search Engine Ranking: Google and other search engines aim to create a secure web. So, search engines now favor SSL-secured HTTPS websites and discourage insecure ones in the search results. If your WordPress website doesn’t have an SSL certificate installed, you are missing something significant regarding SEO and staying away from potential customers.
-
Gain the trust of your users: If users see the secured PADLOCK and HTTPS connection in the URL, they are assured that your website is secured. Now you are gaining the trust of your potential customers. They are confident to purchase your product or service.
Documentation
Please click here for the documentation.
Support and Report a Bug
Please check the existing topics in the WordPress support forum before creating a new topic for support or reporting a bug.
‘AUTO-INSTALL FREE SSL’ IN YOUR LANGUAGE?
Translations can be added easily here if you want to translate in your language.
Credits
- Let’s Encrypt™
- I developed this plugin based on the PHP client/app ‘FreeSSL.tech Auto’, which I developed with a massive rewrite of Lescript.
- cPanel
Let’s Encrypt™ is a trademark of the Internet Security Research Group. All rights reserved.
(Please check the Details tab for MINIMUM SYSTEM REQUIREMENTS.)
Video Tutorial: [cPanel] How to install the plugin and generate & install a Free SSL Certificate for your WordPress website
Video Tutorial: [Plesk] How to install the plugin and generate & install a Free SSL Certificate for your WordPress website
AUTOMATIC INSTALLATION (POPULAR AND EASIEST)
- Log in to the WordPress dashboard (backend/ admin area).
- Then navigate to the ‘Plugins’ menu in the sidebar, and click the ‘Add New’ option.
- In the ‘Search plugins…’ field, type this keyword: ‘Auto-Install’.
- Once you find this plugin, click ‘More Details’ and the ‘Install Now’ button.
- Finally, click the ‘Activate’ button.
Now, check the AFTER ACTIVATION section below.
MANUAL INSTALLATION
- Download the ‘Auto-Install Free SSL’ plugin zip file by clicking the ‘Download’ button at the top-right of this page.
Now check either the WordPress, cPanel or FTP section below. If your web hosting control panel is other than cPanel, the steps are similar to cPanel.
WordPress
- Log in to the WordPress dashboard.
- Then navigate to the ‘Plugins’ menu in the sidebar, and click the ‘Add New’ option.
- Click ‘Upload Plugin’ button.
- Click ‘Choose File’ button and select the downloaded zip file.
- Click ‘Install Now’ button.
- Click ‘Activate Plugin’ button.
Now, check the AFTER ACTIVATION section below.
cPanel
- Log in to your cPanel and click the ‘File Manager’ menu.
- Browse to the document root of your WordPress website and then open the
/wp-content/plugins/directory. - Click the ‘Upload’ menu at the top.
- You see a new window. Drag and drop the plugin’s zip file. It will be uploaded in a few seconds (depending on your internet connection speed). Click Go Back to the “/home/username/public_html/wp-site-document-root/wp-content/plugins” link at the bottom.
- Right-click on the plugin’s zip file, click ‘Extract’, and then click the ‘Extract Files’ button. After completion, you get Extraction Results. Click the ‘Close’ button here.
- Click the ‘Go’ button (at the top-left) to refresh the directory structure. You see the ‘auto-install-free-ssl’ directory here.
- Now check the point-number 2 below.
FTP
- Extract the plugin’s zip file to your computer. You see a folder ‘auto-install-free-ssl.x.x.x’ (the latest version in place of x.x.x), and inside it, the ‘auto-install-free-ssl’ folder. You need to upload this.
- Log in to your web server with your favorite FTP client (e.g., FileZilla).
- Browse to the document root of your WordPress website and then the
/wp-content/plugins/directory. - Upload the ‘auto-install-free-ssl’ folder here.
- Now check the point-number 2 below.
2.- Log in to your WordPress dashboard and go to the ‘Plugins’ page. You see, ‘Auto-Install Free SSL’ is listed here. Click the ‘Activate’ option here. You’re done!
AFTER ACTIVATION
After activating ‘Auto-Install Free SSL’, you’ll be redirected to a page (powered by freemius) where we request you opt-in to our security & feature update notifications and non-sensitive diagnostic tracking. You’ll get links there to learn about this in detail. Then you may or may not allow us to opt-in as you wish. We appreciate your help improving the plugin by letting us track a few non-sensitive usage data.
How to generate a Free SSL Certificate
Generating a free encryption certificate is straightforward. Please follow the steps below:
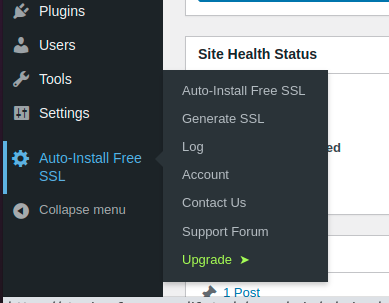
- After the previous step, you’ll be redirected to the Generate SSL page (in most cases). Otherwise, navigate to the ‘Auto-Install Free SSL’ menu in the sidebar, and click the ‘Generate SSL’ option. Screenshot here.
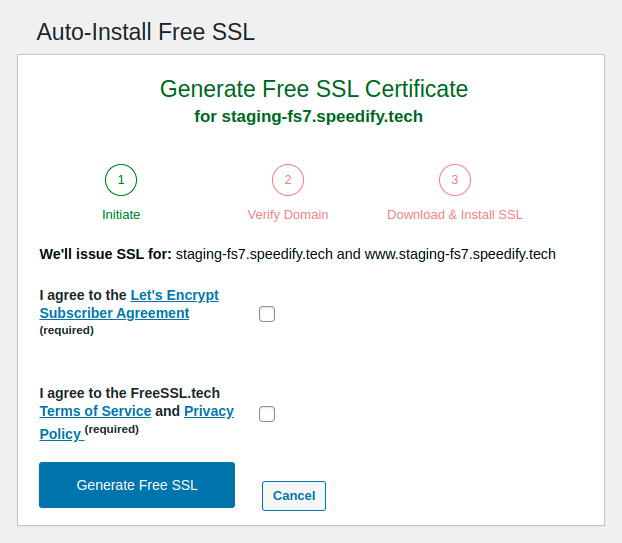
- On the next page, i.e., the ‘Generate Free SSL Certificate’ page, read & agree to the Let’s Encrypt™ Subscriber Agreement and FreeSSL.tech Terms of Service & Privacy Policy by clicking the relevant checkboxes. Then click the ‘Next Step’ button and ‘OK’ in the confirmation dialog box. Screenshot here.
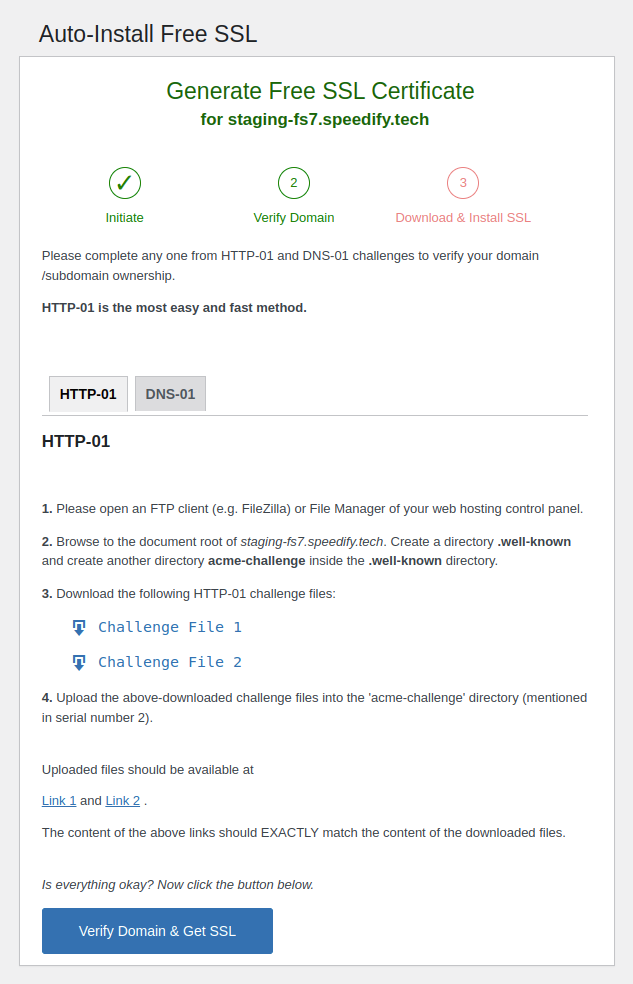
- Wait a few seconds. Then you see the second step: ‘Verify Domain’. Please check the screenshot. You have two methods, HTTP-01 and DNS-01, to verify your domain ownership. You need to complete any one method. We are discussing only the HTTP-01 method, the most popular, easiest, and time-saving method.
HTTP-01
Please follow these steps:
- Log in to your web server with an FTP client (e.g., FileZilla) or the file manager of your web hosting control panel.
- Browse to the document root of your WordPress website. It will be like:
/home/username/public_html/wp-site. Create a directory, ‘.well-known’ and another directory, ‘acme-challenge’, inside the ‘.well-known’ directory. - Click the links’ Challenge File 1′ and ‘Challenge File 2’ to download the HTTP-01 challenge files. Please remember that if the www. alias of your WordPress website doesn’t point to your web server (i.e., offline), you get only one challenge file.
- Upload the downloaded challenge files to the ‘acme-challenge’ directory.
- Uploaded files should be available at ‘Link 1’ and ‘Link 2’. Please click the links. The content/text of the links should EXACTLY match the content of the downloaded files. If it matches correctly, click the ‘Verify Domain (HTTP-01) & Generate Free SSL’ button, and in the confirmation dialog box, click ‘OK’.
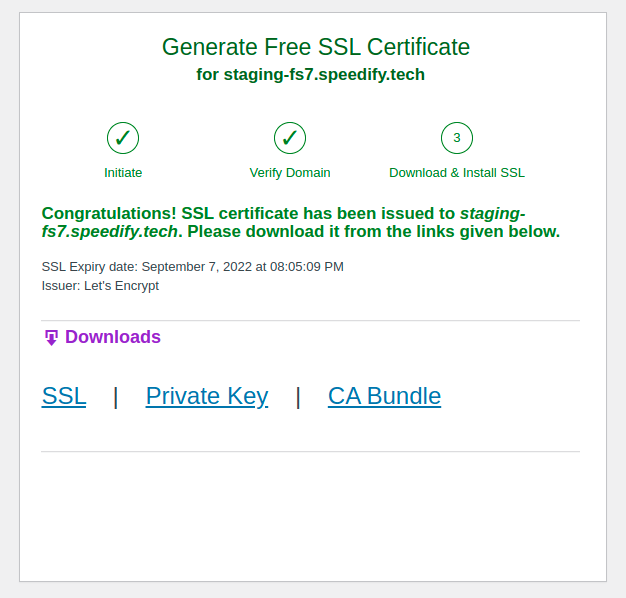
Now wait a few seconds, and you will see a free SSL certificate has been issued to your WordPress website. The page looks like this screenshot. Download the SSL, Private Key, and CA Bundle files (.pem) by clicking the links.
After this, log in to your web hosting control panel and install the SSL certificate on your WordPress website.
How to install the SSL certificate with cPanel
- Log in to your cPanel.
- Type ‘SSL’ in the ‘Search Tools’ text box (in the upper-right corner).
- You get a few search results instantly. Click on the ‘SSL/TLS’. (Don’t click the ‘SSL/TLS Status’.)
- On the SSL/TLS page, you get an option ‘INSTALL AND MANAGE SSL FOR YOUR SITE (HTTPS)’ at the bottom with a link ‘Manage SSL sites.’ Click it.
- On the next page, i.e., ‘Manage SSL Hosts’, you get a section at the bottom, ‘Install an SSL Website’. Here you get a form to install the SSL certificate.
- From the ‘Select a Domain’ drop-down menu, select the domain of your WordPress website.
- Open the ‘certificate.pem’ file (you downloaded it) in a text editor and copy all its content/text, including ‘—–BEGIN CERTIFICATE—–’ and ‘—–END CERTIFICATE—–’. Paste it in the ‘Certificate: (CRT)’ text area.
- Similarly, paste all the content of the ‘private.pem’ file in the ‘Private Key (KEY)’ text area.
- Then paste all the content of the ‘cabundle.pem’ file in the ‘Certificate Authority Bundle: (CABUNDLE)’ text area.
- Now click the ‘Install Certificate’ button and wait a few seconds. Then you get the confirmation dialog box ‘SSL Host Successfully Installed.’ Click ‘OK’.
How to install the SSL certificate with Plesk
- Log in to your Plesk control panel.
- Click the ‘Websites & Domains’ option in the left menu.
- Click on the website for which you need an SSL certificate. There are several options under it.
- Click the option ‘SSL/TLS Certificates’.
- Click the ‘Manage’ button on the next page in the ‘Download or remove existing certificates’ option.
- Click the ‘Add SSL/TLS Certificate’ button on the next page.
- You got the ‘Add SSL/TLS Certificate’ page.
- In the ‘Certificate Name’ text field, write a name.
- You got a section at the bottom of the page, ‘Upload the certificate as text’. Here you have a form to install the SSL certificate.
- Open the ‘certificate.pem’ file (you downloaded it) in a text editor and copy all its content, including ‘—–BEGIN CERTIFICATE—–’ and ‘—–END CERTIFICATE—–’. Paste it in the ‘Certificate’ text area of Plesk.
- Similarly, paste all the content of the ‘private.pem’ file in the ‘Private key’ text area of Plesk.
- Then paste all the content of the ‘cabundle.pem’ file in the ‘CA certificate’ text area of Plesk.
- Now click the ‘Upload Certificate’ button.
- The uploaded SSL certificate is listed on the next page.
- Again, click ‘Websites & Domains’ in the left menu.
- Click the website for which you need an SSL certificate.
- Click the ‘Hosting & DNS’ tab and the ‘Hosting Settings’ option.
- On the next page, i.e., the ‘Hosting Settings’ page, click the ‘Certificate’ selection field and select the certificate we just uploaded.
- Click the ‘Apply’ button and then click ‘OK’.
- Congratulations! The SSL certificate has been installed successfully.
Now you can access your website with ‘https://’.
The options will differ if your web hosting control panel is anything other than cPanel and Plesk, but the concept is similar.
NOTE: The free SSL security certificate issued by Let’s Encrypt™ expires in 90 days. So you need to spend time repeating the process of generating and installing an SSL certificate every 60 days. They recommend renewing 30 days before expiry.
Click the ‘Re-generate (renew) SSL’ button to start renewing.
However, the premium version of this plugin generates (issue/renew) and installs the free SSL certificate automatically. Please check the video tutorial (1:42 min) below and see how easy it is.
Are you interested? Click here to BUY the PREMIUM VERSION.
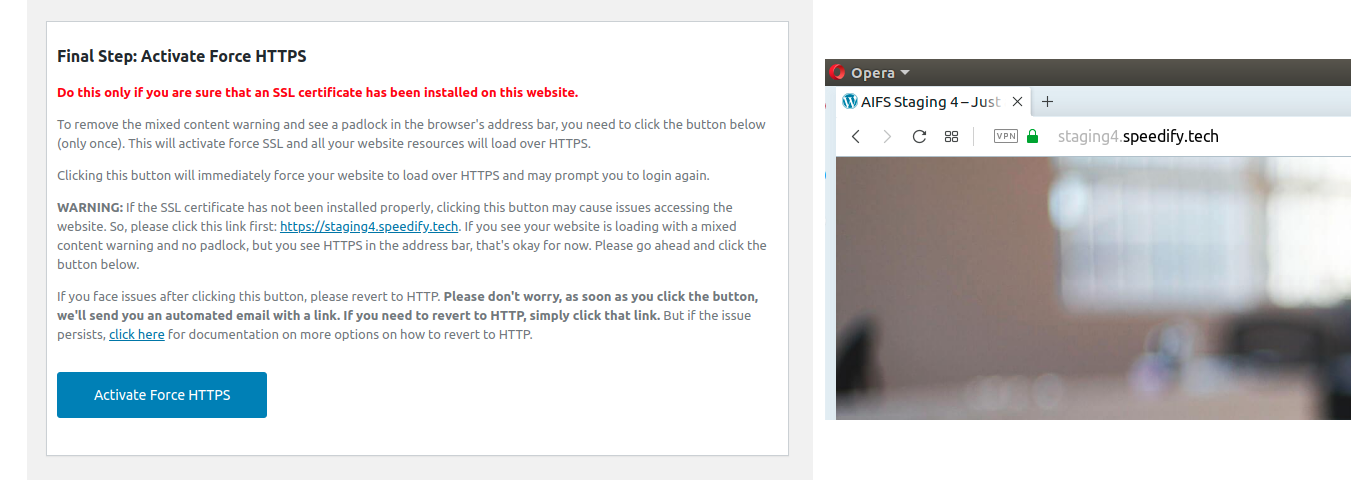
How to Activate Force HTTPS / HTTPS Redirect
After installing the SSL certificate, please perform the following steps:
- In your WordPress dashboard, navigate to the ‘Auto-Install Free SSL’ menu in the sidebar, and click the ‘Force HTTPS’ menu.
- On the next page, click the ‘Activate Force HTTPS’ button. Then click OK.
- You’ll be logged out and redirected to the WordPress login page. Please log in again.
- Now refresh the website’s home page. You’ll see the padlock.
Troubleshooting
Access the ‘Log’ menu within the ‘Auto-Install Free SSL’ menu in the left-hand sidebar. Be sure to review the log for any insights.
If you encounter issues with the Let’s Encrypt™ API connection and wish to log Let’s Encrypt™ server response details for each API call, you can achieve this by writing the following URL in the address bar by replacing ‘www.example.com’ with your domain name, and hit enter:
http://www.example.com/wp-admin/admin.php?page=auto_install_free_ssl&log_all_ca_server_response=yes
To stop logging all responses from the Let’s Encrypt™ server, replace ‘yes’ with ‘no’ in the above URL.
For deeper, AI-assisted troubleshooting, you can additionally log every single Let’s Encrypt™ server response (including responses with an unexpected HTTP status code) in JSON format by writing the following URL in the address bar by replacing ‘www.example.com’ with your domain name, and hit enter:
http://www.example.com/wp-admin/admin.php?page=auto_install_free_ssl&log_all_ca_server_response_array_json=yes
Each logged response is wrapped inside clearly named markers so it can be easily located and extracted from the log file, including by an AI model: [[AIFS_CA_RESPONSE_JSON_FORMAT_START]] … [[AIFS_CA_RESPONSE_JSON_FORMAT_END]] for JSON-encoded array responses, [[AIFS_CA_RESPONSE_ARRAY_FORMAT_START]] … [[AIFS_CA_RESPONSE_ARRAY_FORMAT_END]] when JSON encoding fails, or [[AIFS_CA_RESPONSE_START]] … [[AIFS_CA_RESPONSE_END]] for non-array (raw) responses. To stop logging, replace ‘yes’ with ‘no’ in the above URL.
Difference between the two logging options: aifs_log_all_ca_server_response logs only successful API responses (HTTP status 200, 201, 202, or 204) as plain text. aifs_log_all_ca_server_response_array_json logs every response—including failed or unexpected ones—in a structured, AI-friendly JSON format with clearly named markers for easier parsing.
Please check the existing topics in the WordPress support forum before creating a new topic for support or reporting a bug.
Screenshot Gallery
![Only step [Pro]: one-click installation of Free SSL Certificate](https://ps.w.org/auto-install-free-ssl/assets/screenshot-5.png?rev=2760239)
![SSL certificate has been generated and installed with a single click [Pro]](https://ps.w.org/auto-install-free-ssl/assets/screenshot-6.png?rev=2750244)
![The SSL will be automatically renewed before expiry [Pro]](https://ps.w.org/auto-install-free-ssl/assets/screenshot-8.png?rev=2750244)
![Email confirmation when the plugin automatically renews and installs a free web SSL certificate [Pro]](https://ps.w.org/auto-install-free-ssl/assets/screenshot-9.png?rev=2022543)
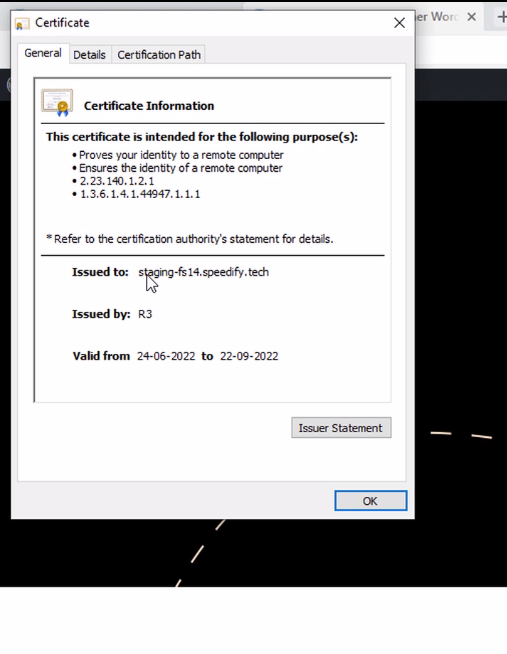
After generating an SSL certificate with this plugin, if SSL installation fails and you see such an error message: “Certificate verification failed! The system did not find the root certificate that corresponds to the supplied Certificate Authority Bundle’s intermediate certificate. Please supply a full Certificate Authority Bundle with the root certificate included.”
Previously, only the intermediate certificate was included in the CA bundle, which caused installation failures on hosting servers (including cPanel servers) where the root certificate was not present in the local trust store.
Version 4.6.3 and later now always includes the root certificate in the CA bundle, which resolves this error. Please update the plugin to the latest version.
This fix also ensures correct handling of Let’s Encrypt’s newer Generation Y chains, which can contain more than three certificates.
Please click here to learn about plugin installation.
Sorry, it doesn’t. Installing the plugin and installing SSL certificates are two different processes. After installing this plugin, you need to do some steps. Please check the ‘AFTER ACTIVATION’ section in the documentation.
However, the Premium plugin installs SSL certificates with complete automation. Please check the video tutorial (1:42 min) at the top of this page and see how easy it is.
Please check the ‘Benefits of installing an SSL certificate on your WordPress website’ above.
Please check the documentation. This documentation is for the free version of the plugin.
If you want complete automation, please check the Premium version’s video tutorial (1:42 min) at the top of this page.
Please click here to learn about installing an SSL certificate on your WordPress website.
FYI, the Premium version installs SSL certificates with complete automation.
Please check the log. It is located in the plugin menu. Most probably, you see an error saying ‘unable to register the account’ along with the following text in the log:
urn:ietf:params:acme:error:invalidEmail
Let’s Encrypt™ API throws this error if an invalid email was set as the admin email of your WordPress website, for example, “yourname@yourdomain.mamp” or “anything@example.com”. Let’s Encrypt™ expects we should register an account with a working email.
To fix this, please update this plugin to the latest version and try generating the SSL again. Then you’ll get a text field to update the admin email address.
Feel free to contact us through the WordPress support forum if you still need help with any issues (with the complete log).
Please visit the plugin’s ‘Force HTTPS’ page and click the ‘Activate Force HTTPS’ button.
This is a temporary issue. You may wait 24 hours or follow these steps:
Please access your website with HTTPS (e.g., https://example.com). If you are sure that the SSL certificate is installed correctly and the padlock is visible, please log in to your WordPress dashboard, open a new tab, write the following URL in the address bar by replacing ‘www.example.com’ with your domain name, and hit enter:
http://www.example.com/wp-admin/admin.php?page=aifs_force_https&aifsaction=aifs_force_https_override&checked_ssl_manually=done&valid_ssl_installed=yes
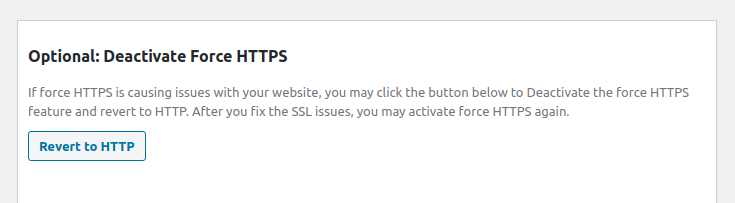
Please click the ‘Revert to HTTP’ button on the plugin’s ‘Force HTTPS’ page.
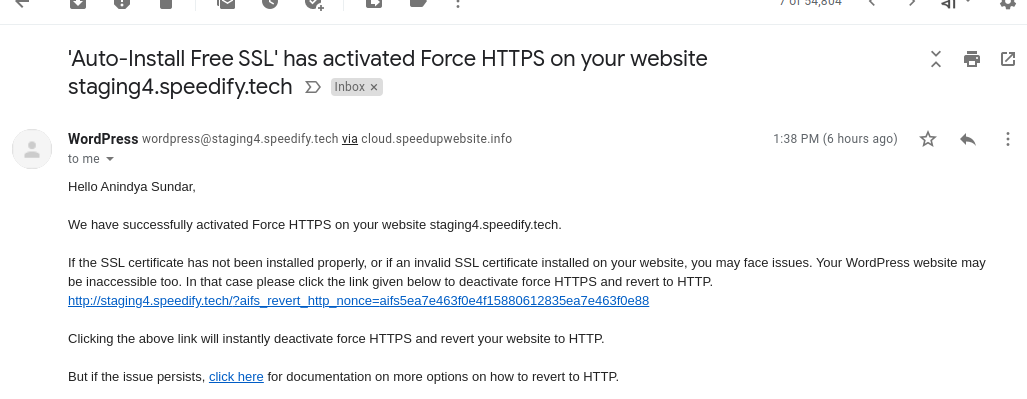
Alternatively, open the email you received after activating the HTTPS redirect (or Force HTTPS) and click the link to deactivate HTTPS redirect and revert to HTTP. The subject line of that email is “‘Auto-Install Free SSL’ has activated Force HTTPS on your website YourDomain.com”. [Replace YourDomain.com with your WordPress website’s domain].
If your website is accessible with WWW and non-WWW versions of the domain name (e.g., www.example.com and example.com) and both A record points to the same IP address, our plugin will include both versions in the free SSL certificate.
The validity period of free HTTPS certificate being 90 days is not a trial but rather a design choice of Let’s Encrypt™ that prioritizes security. With shorter validity periods, Let’s Encrypt™ encourages frequent certificate renewal, ensuring that websites always have up-to-date and secure certificates. This approach reduces the potential impact of compromised certificates.
The premium version of this plugin renews SSL certificates automatically. Automated renewal processes also make it easier for website owners to maintain security without manual intervention. While the 90-day validity might seem short, the automated renewal process ensures seamless and continuous protection for your website’s users.
Please click here to learn the statement of Let’s Encrypt™.
Let’s Encrypt™ issues SSL certificates for domain names rather than bare IP addresses. Free TLS certificates are designed to secure domain names, providing encrypted connections between users and websites. Using SSL certificates with domain names is considered the industry’s best practice.
If you’re looking to secure a website, it’s recommended to associate a domain name with the IP address rather than using the bare IP address. This enhances the user experience and aligns with security and usability standards.
Let’s Encrypt™ does not issue SSL certificates for localhost. Let’s Encrypt™ certificates are intended for public domain names, which are accessible via the internet for the domain control validation (DCV) process. Since localhost is a local server and a hostname used for development, it is not publicly accessible and cannot be validated online using the HTTP-01 challenge (the most common method).
After you complete developing the website in the local development environment, please do the following to secure your website with a free SSL certificate:
- Use an existing web hosting server or hire a new one that is publicly accessible, i.e., available online.
- Use an existing domain name or purchase a new domain name.
- Associate the domain name with the IP address or nameservers of the online web hosting server, i.e., set A records or NS records.
- Migrate the website from your local development environment to the online web hosting server using a Migration and Backup Plugin, like ‘Duplicator’.
- If the domain name mentioned in steps 2 and 3 is different from your local hostname, replace it with the new domain name across all database tables using a plugin like ‘Better Search Replace’.
Rest assured, after you complete the above steps, you can easily generate an SSL certificate with this plugin, i.e., ‘Auto-Install Free SSL’. We’ve made the process as straightforward as possible for your peace of mind.
However, if you use a registered domain name (for your WordPress website), mapped to the localhost IP address (e.g., 127.0.0.1), and use the DNS-01 challenge for the domain control validation (DCV), our plugin will create a free SSL certificate for your registered domain name. Then you can download the SSL certificate files from our plugin’s ‘Generate SSL’ page and manually install them on the local server. In that case, we recommend you map the registered domain name to the localhost IP address (e.g., 127.0.0.1) using your local computer’s host file, but don’t set A records pointing to the localhost IP with your domain registrar. Use your domain registrar only to set TXT records for the DNS-01 challenge. Please read this for more information: https://letsencrypt.org/docs/certificates-for-localhost
It is possible only if you can use the DNS-01 challenge for the domain control validation (DCV).
However, using the HTTP-01 challenge (the most common method), it is not possible. If you map a registered domain name to a localhost IP address, it is still a localhost and can’t be accessed online. This means that the domain name is only accessible from your local computer and cannot be used to get a free SSL certificate from Let’s Encrypt™ using the HTTP-01 challenge. For more details, please refer to the previous FAQ.
Let’s Encrypt™ issues free SSL certificates only after successful domain control validation (DCV).
Let’s Encrypt™ HTTP-01 challenge works by creating a specific text file with specific content in a specified directory (.well-known/acme-challenge/) of the document root of the website, as defined by the ACME standard. The file name and its content are variable. Our plugin creates this file with the specific text by automatically communicating with the Let’s Encrypt™ API server, and as per their requirements. Users of the free version can download the static file and upload it to the specified directory. The premium plugin uploads this file to the specified directory automatically.
It’s the responsibility of your web server to make the static file available at the specific public URL. This is the standard behavior of every web server. To validate your domain control, Let’s Encrypt™ API server accesses the specific URL and checks if the file’s content is valid. For example, the file at the following URL:
http://yourdomain.com/.well-known/acme-challenge/pqv-gjW9kF0VjktRxdqpPNK-0tLA_n5ORCzuB71-Zog
Must return this exact content or text:
pqv-gjW9kF0VjktRxdqpPNK-0tLA_n5ORCzuB71-Zog.aSOSwUGmotjVbnE_hY1u-2wwHhwyl5qtPLVr4COOSQs
If your web server (or hosting provider) purposefully blocks access to such files, Let’s Encrypt™ cannot validate that you control the domain, and will not issue an SSL certificate for your domain name.
Please contact your web hosting provider and ask whether they allow Let’s Encrypt™ API access to HTTP-01 challenge files.
Optionally, follow these steps: create two directories (i.e., folders) ‘.well-known/acme-challenge/’ in the document root of your domain name or website. Create a static file with the following file name:
pqv-gjW9kF0VjktRxdqpPNK-0tLA_n5ORCzuB71-Zog
and without any file extension inside the ‘.well-known/acme-challenge/’ folder. Copy the following content into the file and save it:
pqv-gjW9kF0VjktRxdqpPNK-0tLA_n5ORCzuB71-Zog.aSOSwUGmotjVbnE_hY1u-2wwHhwyl5qtPLVr4COOSQs
Then try to access it over HTTP like the following URL:
http://yourdomain.com/.well-known/acme-challenge/pqv-gjW9kF0VjktRxdqpPNK-0tLA_n5ORCzuB71-Zog
(Make sure to replace ‘yourdomain.com’ with your actual domain name.) If you can see the exact file content in your browser, your server is ready.
However, some hosts allow you to view the file manually in a browser but block Let’s Encrypt™ API from accessing it, which also causes failures. So, the best way is to ask your web hosting provider.
All other Let’s Encrypt clients who auto-install free SSL certificates need root access, a higher privilege than the cPanel user. In shared hosting, the root access belongs to the web hosting company. So those clients will not work on shared hosting.
cPanel username and password (or API Token) are required to install the free SSL certificate with the cPanel API automatically. Let’s Encrypt SSL’s lifetime is 90 days. You need to get and install another SSL certificate before the expiration of the current SSL. If you provide your cPanel username and password (or API Token), this plugin will do this repeated job automatically. All your credentials remain safe in your database. Moreover, ‘Auto-Install Free SSL’ encrypts the password (or API Token) before saving it in your database.
We or Let’s Encrypt don’t collect any credentials. This plugin’s source code is open for audit. The WordPress team approved it after the audit. Please feel free to audit yourself too.
You don’t need to set the Cron Job manually. It works by default (from version 3.0.0). However, ‘Auto-Install Free SSL’ can add an optional cron job with one click from your WordPress dashboard (available for unlimited sites license).
Since version 3.0.0, You can access the cron output by clicking the ‘Log’ menu.
If you have an unlimited site license and created a cron job manually, ensure you have provided your email address in the ‘Cron Email’ section of the Cron Jobs page of cPanel.
Changelog
5.0.0
- [Pro] Feature: GoDaddy DNS Service Provider entries can now use either a classic API Key/Secret pair or a newer Personal Access Token (PAT) for wildcard SSL DNS-01 validation; GoDaddy TXT records are updated in place on renewal instead of being deleted and recreated.
- [Pro] Fix: Wildcard SSL certificate issuance using the DNS-01 challenge (any DNS Service Provider, including cPanel) was completely broken — every wildcard request sent an empty challenge response to Let’s Encrypt™ and was rejected. This is now fixed.
- [Pro] Security: Following a full-codebase security review, closed several cPanel credential-exposure issues: cPanel API debug logging (which could log raw API responses/headers) is now off by default, cPanel credentials were briefly written back into the WordPress options table on every admin page load in cPanel mode (now fixed), and the plugin log’s secret-redaction pattern now also masks base64/base64url tokens (e.g. cPanel/DNS-provider API tokens), not just hex ones.
- Security: The certificate-file download page, the manual HTTP-01 challenge-file handler, and the Log page’s date parameter now require administrator (manage_options) capability and strictly validate their inputs, closing a path-traversal opening that could allow reading or writing files outside the plugin’s own certificate folder.
- Security: Added a missing nonce/capability check to the Force HTTPS override link, and switched the Force HTTPS “revert” link (sent by email) to a timing-safe comparison for its one-time secret.
- [Pro] Security: Added missing nonce/capability checks (CSRF protection) to the Domains and DNS Service Provider “Delete” links and to the Add Cron Job form.
- Security: Hardened output escaping on the Log page, admin notices, and the Generate SSL page’s admin-email field, closing a couple of admin-only XSS opportunities.
- [Pro] Security: Hardened output escaping on the live log stream, the Download SSL Certificates page, and the Domains / DNS Service Provider / Revoke SSL Certificate settings screens, closing a handful of admin-only XSS opportunities.
- [Pro] Security: DNS record values sent to the Namecheap API are now properly URL-encoded, so a value containing “&” or “=” can no longer corrupt the request or drop unrelated DNS records; fixed Cloudflare DNS-01 TXT-record creation failing (or erroring) for subdomains and on API authentication errors, and fixed it creating a duplicate TXT record instead of updating the existing one for a subdomain; the DNS Service Provider list is now limited to the providers this plugin actually supports.
- [Pro] Security: Added an optional shared-secret and a run lock for cron.php when triggered over HTTP (configurable from the Add Cron Job page), and a warning on the cPanel Settings page when TLS certificate verification is left disabled while a verified connection to the same host is confirmed to work.
- [Pro] Reliability: Added connection/response timeouts to all cPanel API calls so an unresponsive cPanel host can no longer hang a cron run or admin request.
- [Pro] Fix: Account-key rollover (during Let’s Encrypt™ key changes) now updates the private and public key files as a single atomic operation, so a failure partway through can no longer leave mismatched key files on disk.
- [Pro] Fix: Fixed wildcard-domain grouping so a domain that didn’t need renewal no longer corrupts the grouping of domains checked afterward, and fixed two logic bugs that could make the plugin miss an existing (or already-issued wildcard) certificate and waste Let’s Encrypt™ rate-limit budget on an unnecessary reissue.
- Fix: Fixed several code paths that could fatal or misbehave with an unwritable log file, a non-array admin-email setting, a corrupt/unparseable SSL certificate in the SSL renewal reminder email, or an undefined array offset on the Generate SSL page on a fresh install.
- [Pro] Fix: Fixed a wide class of fatal PHP 8 errors that could occur on a fresh install, or with a stale/tampered settings URL, across the premium settings screens (Revoke SSL Certificate, Multi-Domain, Add Domain, Add DNS Service Provider), in the main cron/issuance flow when an invalid ACME protocol version was configured, and when building admin notification emails or rendering the Download SSL Certificates page from a corrupt certificate.
- [Pro] Fix: Restored a missing regular-expression match that made converting a certificate from PEM to DER format always produce corrupt output during cPanel SSL installation.
- Reliability: Fixed a dead status check in ACME challenge verification, bounded every previously-unbounded ACME polling loop (challenge verification, certificate fetch) with a maximum attempt count and a time limit so a stuck step now fails cleanly with a log entry instead of hanging indefinitely, and guarded several unchecked ACME server response reads against an unexpected response shape.
- [Pro] Fix: Removed a remaining curl_close() call path for PHP 8.5, where the function is deprecated and cURL handles are garbage-collected automatically.
- [Pro] cPanel: Since cPanel 134 (released 2026-08-24) disables password (HTTP Basic) authentication for its API by default, API Token is now the recommended and default authentication method throughout the plugin: the cPanel Settings page lists API Token before Password, pre-selects it, pre-checks SSL certificate verification for new installs, and shows/hides the relevant cPanel 134+ and TLS-verification warnings as you change your choices; an explicit “Authenticate With” (API Token / Password) choice and a “Clear the stored API token” option make switching between the two reliably take effect instead of a stale stored token silently continuing to be used; and wildcard SSL with cPanel as the DNS Service Provider no longer requires a password at all — DNS-01 TXT records are now added through cPanel’s UAPI (or the legacy ZoneEdit API on older servers), both authenticating with the API Token.
- [Pro] cPanel: When a connection fails and a password was the credential actually used, the cPanel 134+ cause is now clearly explained — with a 2FA-specific hint and guidance toward creating an API Token — at the top of the possible-causes list on the cPanel Settings page, the Exclude Domains page, the dashboard admin notice, the notification email, and the plugin log, instead of as static help text alone.
- [Pro] cPanel: cURL connection errors (including SSL/TLS certificate verification failures) are now always written to the plugin log for troubleshooting, even though the on-screen message stays generic.
- [Pro] cPanel: Added the Let’s Encrypt™ / FreeSSL.tech Terms of Service & Privacy Policy agreement text directly above the cPanel Settings submit button.
- [Pro] cPanel: Fixed DNS-01 wildcard SSL validation creating a duplicate _acme-challenge TXT record in the DNS zone on each renewal, instead of updating the existing record in place.
- [Pro] Fix: The Namecheap DNS Service Provider’s TLD list lookup could fatal error when Namecheap’s API returned an error instead of a TLD list (e.g. from an unrecognized IP address), and could then cache that failed lookup for up to 7 days; both are now fixed.
- [Pro] Fix: Saving a DNS Service Provider with an invalid field (e.g. a blank required API Identifier) appeared to succeed instead of showing the validation error; and switching GoDaddy’s authentication method from Personal Access Token back to Classic API Key no longer leaves the API Identifier field able to be submitted blank.
- Security: HTTPS redirects (Force HTTPS) now always target the site’s configured Home URL host, instead of the requested Host header. This is intentional hardening against Host-header-based redirect abuse; if you intentionally serve this site under multiple hostnames (an alias domain, a staging/preview subdomain, IP-based smoke testing), every HTTP visitor to those hosts is now redirected to the canonical Home URL host.
- Fix: Force HTTPS (activate/deactivate/revert) now detects when WP_SITEURL/WP_HOME is hard-coded in wp-config.php — previously it silently wrote a siteurl/home value to the database that WordPress ignores, while still showing a success message and sending a confirmation email. It now shows one combined notice pointing you to wp-config.php instead of a misleading success message stacked with a separate error.
- [Pro] Exclude Domains: Fixed excluding a domain no longer excluding its cPanel server aliases, which could cause SSL issuance to silently retry an alias domain the admin had explicitly excluded; and fixed the page showing a false “can’t connect to cPanel” error before any cPanel host or credentials had actually been saved.
- [Pro] cPanel: A stale cPanel connection-failure notice on the dashboard now clears as soon as the cPanel Settings form is saved again, instead of persisting indefinitely.
- [Pro] Add Domain: A document root that can’t be verified with realpath()/is_dir() (e.g. under open_basedir restrictions on shared hosting) is now saved with a warning instead of being rejected outright. A document root that does resolve via realpath() but isn’t a directory (e.g. it points at a file) is still rejected outright, since that case is never valid and is not the open_basedir “unverifiable” case above.
- Security: Fixed a bug where, if the plugin could not obtain a fresh ACME nonce after its retries were exhausted, the ACME client could still report a stale HTTP 200 left over from those unrelated nonce-fetch attempts. The account-key-rollover and certificate-revocation code paths trusted that stale status, so a transient nonce failure could make the plugin believe a key rollover or certificate revocation had succeeded — deleting the real account key or a still-valid certificate. The client now invalidates the last response status whenever a signed request is aborted before it’s actually sent.
- Reliability: Fixed a possible unbounded-recursion hang when the ACME server does not return a Replay-Nonce header (e.g. during a Let’s Encrypt™ outage); the plugin now retries a bounded number of times and then fails with a clear error.
- Reliability: Fixed a logging bug where a failed log-directory creation could silently disable all further logging for the rest of a cron run.
- Reliability: ACME HTTP requests blocked by this site’s own WP_HTTP_BLOCK_EXTERNAL setting now log an actionable message naming the ACME hosts to add to WP_ACCESSIBLE_HOSTS, and no longer hard-kill a CLI cron run on the first failed request.
- Security: A PHP build that cannot generate cryptographically secure random values now fails safely (with a clear admin notice and a technical log entry) when saving a cPanel password/API token or DNS provider credential, instead of a raw PHP fatal error or, worse, silently storing unencrypted-looking data.
- Introduced a new capability to log every single Let’s Encrypt™ server response (even those with an unexpected HTTP status code) in JSON format, wrapped inside AI-agent friendly markers to assist AI-based troubleshooting. This can be activated by setting the option ‘aifs_log_all_ca_server_response_array_json’ to true, or by accessing the following URL (login required):
http://www.example.com/wp-admin/admin.php?page=auto_install_free_ssl&log_all_ca_server_response_array_json=yes (Please replace ‘www.example.com’ with your domain name.) - Improved minimum system requirement checks: validate PHP, WordPress, OpenSSL, and cURL on activation and in admin; soft-fail cron/SSL actions when requirements are missing, without taking down the public site.
- Update tested compatibility to WordPress 7.1 in readme.txt
- effectiveTLDs.inc.php was updated from the latest Public Suffix List.
- Fix: Force HTTPS (activate/deactivate/revert) now detects when WP_SITEURL/WP_HOME is hard-coded in wp-config.php — previously it silently wrote a siteurl/home value to the database that WordPress ignores, while still showing a success message and sending a confirmation email. It now shows one combined notice pointing you to wp-config.php instead of a misleading success message stacked with a separate error.
4.7.0
- The plugin is now compatible with PHP 5.6 through 8.5.
- [Pro] Compatibility: Fixed a compatibility regression introduced in the previous release that prevented the plugin’s cPanel settings, cron job, and issue SSL option loading on PHP 5.6. Replaced PHP 7.0+ null coalescing syntax with PHP 5.6–safe alternatives in cPanel API error handling.
- Compatibility: Added array guards before count() calls to prevent PHP 7.2+ warnings.
- Compatibility: Replaced strlen() checks on WordPress options and nullable values with !empty() to avoid PHP 8.0+ TypeErrors and PHP 8.1+ deprecations.
- Compatibility: Added explicit property declarations in ACME, DNS API, and cPanel classes to resolve PHP 8.2 dynamic property deprecations.
- Compatibility: Removed redundant curl_close() calls to address PHP 8.5 deprecations.
- Compatibility: Aligned the runtime PHP version check with the declared minimum requirement of PHP 5.6.
- Removed the deprecated indigophp/hash-compat package and updated Composer autoloading accordingly.
- Updated usrflo/registered-domain-libs with the latest Public Suffix List TLD tree, including new TLD entries and structural improvements. Improved registered-domain validation to better support internationalized (UTF-8) domain names.
- Optimized registered-domain parsing by reusing a single regDomain instance per request.
- Updated the Freemius WordPress SDK to version 2.13.4.
- Changed: removed the hard requirement for allow_url_fopen. The plugin uses cURL for ACME and related HTTP requests; allow_url_fopen is only a fallback in legacy cPanel XML-API code when cURL is unavailable.
- Added an explicit WordPress 4.1+ runtime check (including the cron.php fallback path) to match the plugin header and documentation.
- Updated readme.txt minimum requirements to remove allow_url_fopen check.
4.6.3
- Fix: The CA bundle now always includes the root certificate. Previously, only the intermediate certificate was included in the CA bundle, which caused installation failures on hosting servers (including cPanel servers) where the root certificate was not present in the local trust store. This fix also ensures correct handling of Let’s Encrypt’s newer Generation Y chains, which can contain more than three certificates.
- [Pro] Fix: Improved cPanel API error logging to correctly handle all response types. Previously, only the first ‘errors’ was included. The logger now safely handles null, arrays, and any unexpected types, and labels each section of errors, messages, and warnings for easier diagnosis.
4.6.2
- Fixed WordPress 6.7+ translation loading notices by delaying plugin textdomain usage until the init hook.
- Delayed admin class initialization to prevent translation functions from running too early.
- [Pro] Reused the plugin environment check handler in cron.php and removed early translated requirement messages.
- Replaced direct-access translated die() messages with plain text to avoid early translation loading.
- Updated the Freemius WordPress SDK to version 2.13.1.
- Updated readme.txt
4.6.1
- Fixed one line of code that requires PHP 7.0 or later. But this plugin supports PHP 5.6
- Updated the Freemius WordPress SDK to version 2.13.0.
- Updated readme.txt
4.6.0
- Enhanced Error Logging: Enhanced error logging for domain control validation failures using HTTP-01 challenge, now including the challenge URI content for improved debugging and diagnostics.
- Optimized Server IP Detection: Optimized the aifs_ip_of_this_server() function to accurately detect the server’s IP address, ensuring reliable results even when SERVER_ADDR returns false positives.
- Improved Localhost Detection: Improved the is_localhost() function in AutoInstallFreeSSL\FreeSSLAuto\Admin\Factory to accurately determine if the website is hosted on a localhost environment.
- Improved Help Text: Updated help text of the ‘Generate SSL’ page to provide clearer guidance for WordPress installations on localhost and bare IP addresses, enhancing user experience.
- Enhanced UI Functionality: Modified the ‘Generate SSL’ page to disable the ‘Next Step’ button when WordPress is installed on a bare IP address, preventing invalid actions.
- Updated the Freemius WordPress SDK to version 2.12.1.
4.5.1
- Updated the Freemius WordPress SDK to the latest version.
4.5.0
- Updated the Freemius WordPress SDK to version 2.10.1.
- Improved some code.
- Fixed _load_textdomain_just_in_time notice.
- Fixed some minor issues.
4.4.0
- Updated the Freemius WordPress SDK to version 2.9.0.
4.3.0
- Updated the URL of the Let’s Encrypt™ Subscriber Agreement and made it dynamic.
- Updated the Freemius WordPress SDK to version 2.8.1.
- [Pro] Fixed an issue with filtering domain and aliases if the control panel is not cPanel.
4.2.0
- Updated the Freemius WordPress SDK to version 2.7.4.
- [Pro] Added a feature to group all domains by document root, useful for users with multiple aliases (i.e., ServerAlias) for domains sharing the same document root.
4.1.0
- Fixed an issue with the documentroot being passed with the domain and ServerAlias in Step 1 of generating a free SSL certificate.
- Improved error handling in Step 1 of generating a free HTTPS certificate.
- [Pro] Fixed an issue for non-cPanel websites: SSL certificate file path was not loaded correctly during the first time free ssl security certificate generation.
- Improved the function aifs_ip_of_this_server() to support IPv6.
- Added functions to detect if the WordPress website is hosted on localhost or a bare IP address. Displays information and recommendations in the WordPress dashboard, as Let’s Encrypt™ does not issue free HTTPS SSL certificates for localhost and bare IP addresses.
- Updated the Freemius WordPress SDK to version 2.7.3.
4.0.0
- Improved the Generate SSL page.
- [Pro] Improved the main page.
- [Pro] Fixed an bug with automatic SSL installation on cPanel if the plugin generates the SSL certificate for the first time.
- [Pro] Added a page to download SSL certificates if the license is for unlimited sites and multi-domain mode is activated. In any other cases, the users was already able to download the SSL certificate from the plugin’s main page.
- Updated the Freemius WordPress SDK to version 2.7.2.
- Introduced toggle switch option to enable or disable SSL renewal reminders before the expiry.
- Moved Delete plugin data on plugin deactivation option from Log page to Generate Free SSL Certificate page (main page in case of premium).
- Introduced toggle switch option to enable or disable ‘Delete plugin data on plugin deletion’ option.
- Moved Delete plugin data on deactivation logic to Freemius after uninstall action. Now plugin data will be deleted (if enabled) on plugin deletion (i.e., uninstallation) instead of deactivation.
- Added an option to download the fullchain.pem file of the free encryption certificate if the web server software is NGINX.
- Extended the option to exclude domain alias for single domain mode. However, for now, it need to be done through database entry.
- Improved the logic that checks if the domain aliases are online with CURL (in addition to fsockopen).
- Improved minimum system requirement check.
- Moved Schedule daily Cron Job Event logic to the activation hook.
3.6.10
- Updated the Freemius WordPress SDK to version 2.6.2.
- [Pro] Fixed an issue with displaying a log message.
3.6.9
- Updated the Freemius WordPress SDK to version 2.6.1.
- [Pro] Added an existing video documentation in the cPanel settings page.
3.6.8
- Introduced an email field in the first step of the free https certificate generation process to gather the admin email ID. This update ensures a valid email ID is provided for Let’s Encrypt account registration. In previous versions, the WordPress Administration Email Address was used for this purpose. However, certain hosting providers’ systems set an incorrect email as the WordPress Administration Email Address, leading to bounced emails for renewal reminders.
3.6.7
- Updated the Freemius WordPress SDK to version 2.6.0.
3.6.6
- Substituted the deprecated function get_currentuserinfo() with wp_get_current_user().
- Enhanced some instructions for manual SSL generation.
- [Pro] Enhanced the logging code for cases where the ‘.well-known/acme-challenge’ directory is not writable.
3.6.5
- In version 3.6.3, we introduced A record verification for all domain aliases against the server’s IP address to cater to specific use cases. However, this caused issues for some websites to generate free ssl cert, especially those using CDNs. In this update, we’ve adjusted our approach: by default, only the ‘mail.’ alias A record is verified, as was the case in version 3.6.2 and earlier. However, the user can enable A record verification for all domain aliases if needed by setting ‘aifs_verify_ip_for_all_domain_alias’ to true.
3.6.4
- Improved the detection process (and fixed a related bug) of the server’s IPv4 address where the WordPress website is hosted.
- Updated the Freemius WordPress SDK to version 2.5.12.
3.6.3
- Resolved a loading issue with the theme editor in the WordPress 6.3 dashboard when Force HTTPS is activated.
- Enhanced IP address verification logic for all available domain aliases, as opposed to solely the ‘mail.’ alias in previous versions. Now, it filters out the domain alias (when generating the free TLS certificate) if its A record differs from the server’s IP address. Note that if the option ‘aifs_verify_ip_for_mail_dot_domain_alias_only’ is set to true, it will verify the IP address of the ‘mail.’ alias exclusively. However, if the option ‘aifs_selected_verification_method_dns01’ is set to true (making DNS-01 the default method), the above verification will not occur.
- Updated the Freemius WordPress SDK to version 2.5.11.
3.6.2
- Enhanced error handling logic for cases where after submitting a request to the ‘finalize’ URL, the response from Let’s Encrypt contains an empty ‘certificate’ key (location value).
- Resolved an issue where the ‘finalize’ response in the cert free generation process was unintentionally removed from the database.
- Introduced a new capability to activate the option ‘aifs_log_all_ca_server_response’ by accessing the following URL (login required):
http://www.example.com/wp-admin/admin.php?page=auto_install_free_ssl&log_all_ca_server_response=yes (Please replace ‘www.example.com’ with your domain name.)
3.6.1
- Fixed the issue with character encoding for sending automated email notifications to support multilingual characters.
- Added feature to write Let’s Encrypt free https cert server response details in the log files for every API call (if the option ‘aifs_log_all_ca_server_response’ is set to true). This will be helpful for troubleshooting.
- Removed WordPress translation function __() for some error and exception messages (which are intended for developers) to make those English only.
- Tested up to: 6.3
3.6.0
- Improved the domainsArray() function that filters domain and server alias.
- Created a new function to detect the IPv4 of the server.
- Created a new function to get the confirmed and domain-specific free https ssl certificate directory.
- Improved the function that detects the cPanel host and fixed a premium version-specific issue with it.
- Updated the Freemius WordPress SDK to 2.5.10
- Automatic entry of some initial data has been moved to the activation hook.
- [Pro] Improved the function sslRequiredForFirstTime() called before generating a free web ssl certificate.
- [Pro] Created a new function to detect if the given domains array has at least one Wildcard domain.
- [Pro] Improved some free tls cert generation and installation logic.
- [Pro] Added a feature that detects if the cPanel hostname was changed and updates it automatically.
- [Pro] Added a feature that detects if cPanel credentials were changed and send notifications by email and admin notice.
- [Pro] Improved the functionality to send notifications by email and admin notice if the encryption key was changed.
Please click the following URL for the previous changelog:
https://freessl.tech/aifs_changelog.txt
" width="120" height="120">
Available Versions
| Version | Download | Type |
|---|---|---|
| 5.0.0 | Download | Stable |
| 4.7.0 | Download | Stable |
| 4.6.3 | Download | Stable |
| 4.6.2 | Download | Stable |
| 4.6.1 | Download | Stable |
| 4.6.0 | Download | Stable |
| 4.5.1 | Download | Stable |
| 4.5.0 | Download | Stable |
| 4.4.0 | Download | Stable |
| 4.3.0 | Download | Stable |
| 4.2.0 | Download | Stable |
| 4.1.0 | Download | Stable |
| 4.0.0 | Download | Stable |
| 3.6.10 | Download | Stable |
| 3.6.9 | Download | Stable |
| 3.6.8 | Download | Stable |
| 3.6.7 | Download | Stable |
| 3.6.6 | Download | Stable |
| 3.6.5 | Download | Stable |
| 3.6.4 | Download | Stable |
| 3.6.3 | Download | Stable |
| 3.6.2 | Download | Stable |
| 3.6.1 | Download | Stable |
| 3.6.0 | Download | Stable |
| 3.5.1 | Download | Stable |
| 3.5.0 | Download | Stable |
| 3.4.3 | Download | Stable |
| 3.4.2 | Download | Stable |
| 3.4.1 | Download | Stable |
| 3.4.0 | Download | Stable |
| 3.3.2 | Download | Stable |
| 3.3.1 | Download | Stable |
| 3.3.0 | Download | Stable |
| 3.2.15 | Download | Stable |
| 3.2.14 | Download | Stable |
| 3.2.13 | Download | Stable |
| 3.2.12 | Download | Stable |
| 3.2.11 | Download | Stable |
| 3.2.10 | Download | Stable |
| 3.2.9 | Download | Stable |
| 3.2.8 | Download | Stable |
| 3.2.7 | Download | Stable |
| 3.2.6 | Download | Stable |
| 3.2.5 | Download | Stable |
| 3.2.4 | Download | Stable |
| 3.2.3 | Download | Stable |
| 3.2.2 | Download | Stable |
| 3.2.1 | Download | Stable |
| 3.2.0 | Download | Stable |
| 3.1.3 | Download | Stable |
| 3.1.2 | Download | Stable |
| 3.1.1 | Download | Stable |
| 3.1.0 | Download | Stable |
| 3.0.7 | Download | Stable |
| 3.0.6 | Download | Stable |
| 3.0.5 | Download | Stable |
| 3.0.4 | Download | Stable |
| 3.0.3 | Download | Stable |
| 3.0.2 | Download | Stable |
| 3.0.1 | Download | Stable |
| 3.0.0 | Download | Stable |
| Development | Download | Trunk |
